Audio Answers:
How to Rackmount Studio Gear?
Question: “I want to take my home studio to the next level and notice that most studio gear is meant to be rackmounted. So, I’m wondering how to rackmount studio gear and what else I need to know?”
What is Rackmount Studio Gear?
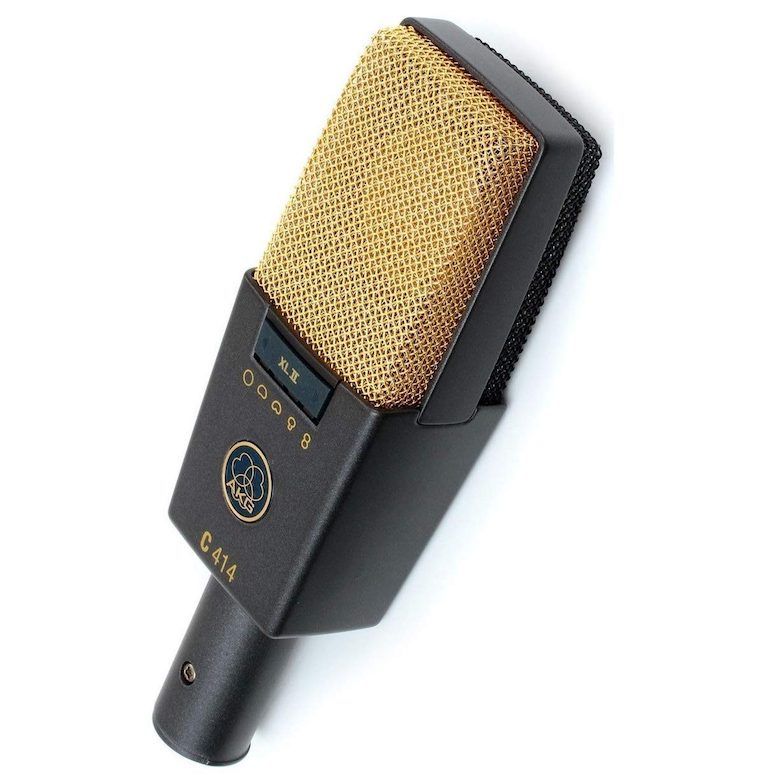
As you progress in music production, you’re bound to make some upgrades to your studio gear. What you’ll find is the vast majority of professional studio gear, such as preamps, compressors, and equalizers are designed to be rack-mounted.
Why is studio gear rack-mounted?
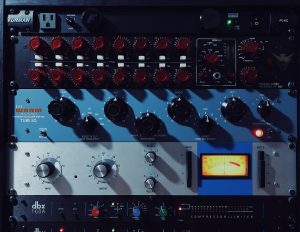
As you collect more gear, space becomes more of a concern. If you’ve seen professional music studios you’ll notice that their studio equipment appears stacked on top of one another. You will also see the gear is of a very uniform size, with the same width and similar heights.
In order to keep things organized most professional studio gear is designed to fit snuggly into 19-inch racks. These racks have a frame with ears that protrude out on each side, allowing your gear to be fastened to the frame with screws. With rackmount gear, you conserve space in your studio and also allow comfortable access to the front-panel controls of your studio gear.
Most racks also provide easy access to the back of your gear from behind. Because the gear is kept close and stacked like a tower, this also allows you to optimize the length and direction of your cabling. Rack mounting studio gear simply makes sense.
Despite it appearing that the gear is resting on top of one another, in most cases, they are usually slightly floating above one another and held up and fully supported by the rack frame which they have been screwed into. Most rackmount gear is designed for its front-panel to bear all its weight and does a great job supporting even heavy gear if properly mounted.
How do I know if a piece of studio gear can be rack-mounted?
Look closely at the product you’re interested in and if you see that it appears to have ears that stick out of the sides of the front panel with screw holes, then this means it’s designed to be rack-mounted and can be securely screwed into a rack.
What About Different Rackmount Sizes?
The size of rackmount gear is very standardized. When it comes to width, virtually all rack gear is designed to fit into a standard 19-inch rack. The exception is “half-rack” gear. This type of gear is far less common, and as you might expect, half the width of standard rackmount gear. The width of your rackmount gear is usually a minimal concern. One glance at a piece of studio gear and you’ll be able to tell whether it is standard size or half-rack, due to the large difference in width.
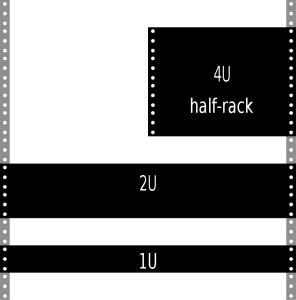
In the above image, you’ll see that each piece of gear represented is of a different height. You see that the tallest is the half-rack piece of gear indicated by 4U. As the height decreases or increases so does this number. Below you see 2U (half the height of the 4U gear) and 1U (half the height of the 2U gear).
The units you see are known as rack units. Rack units simply indicate the height of a piece of gear in terms of how much rack space it will occupy. Each rack unit is 1.75 inches (44.5mm). A 16U rack will house 16 1U pieces of studio gear, or 8 pieces of 2U gear, or 4 pieces of 4U gear, for example.
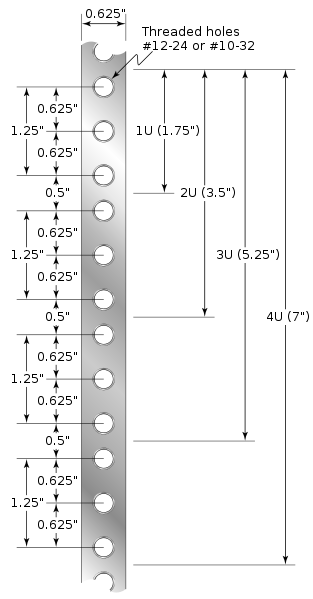
Of course, your rack will hold a combination of such gear with varying heights. And, rack rails are designed to allow you to place your gear in whatever combination desired. Shown below is a typical rack rail showing various rack unit configurations. This allows you the versatility to strategically place your gear as you want.
How to Rackmount Studio Gear
Rackmounting studio gear is straightforward. There are typically four screw holes on the front panel of each piece of rackmount studio equipment, one at each corner. You’ll want to plan out and choose your desired location on the rack for your piece of gear. We recommend you mount your most commonly used gear in accordance with your most comfortable position, whether this is standing or sitting down. This usually means mounting your favorite gear higher up on your rack and your least used gear closer to the floor.
It’s good measure to first line your piece of studio gear up with the rack holes in your desired location before you go ahead and start screwing it in. You will ensure that you haven’t chosen a series of rack holes that do not align with your desired configuration by doing this. If you see the rack screw holes inside your gear’s front-panel screw holes after aligning with your desired rack location, then you’re good to go.
Supporting Your Gear While Mounting
The greatest challenge you’ll likely face when you rackmount your studio gear is going to be how to support your studio gear while you attempt to screw it to the rack. The most obvious way to eliminate this issue is to turn your studio rack down on its back, flat on the ground. You can then place your studio gear on top of the rack rails at your desired location and it will be comfortably supported and make it very easy to screw in and attach.
While we would recommend this more than any other method, this will not be feasible in many situations. If your rack is part of your studio desk, is very heavy, or, if in the future you want to mount more gear in conjunction with your previously rack-mounted gear, it may simply be more trouble than it’s worth. You’ll have to resort to rackmounting your studio gear against the power of gravity.
The easiest way to rackmount studio gear when your rack is upright and you’re working against gravity is to simply have a partner help you out. This is obvious. They can simply hold up your piece of gear while you screw it in. However, you may not have anyone to help you or may prefer to mount it on your own. Not to mention, music producers tend to be introverts, and you simply may not have any friends to help you. But, that’s a topic for another AudioGearz article..
Rackmounting Without Help
If your piece of rackmount gear only occupies 1 rack unit (1U), and you’re on your own, then you can probably just tough it out and hold up the gear with one hand while you screw it in with your other. 2U studio gear will usually be heavier and may give you some trouble. With 3U or 4U gear you’ll probably need to have arms of steel if you expect to firmly hold your gear up with one hand while the other hand screws it in.
If you simply don’t have the strength to support your gear with your own bare hands, don’t hurt yourself. If you can’t find help, you may choose to get creative. Personally, there have been times where I have chosen to stack books underneath the desired rack location, in order to support my gear while I screwed it in. I don’t recommend this, but I’ve seen more creative methods used during this process, methods I would not recommend. Keep you and your gear safe!
Mounting Technique
When it comes to supporting your studio gear while you screw it in, deciding to screw in the proper corners first will make this process a lot easier. It may be obvious, but it makes no sense to screw in the bottom corners before the top ones. If you’re holding up the gear with one hand while screwing in with the other, you’re working against the clock. This clock is your muscle stamina.
If your arm tires out after getting one screw in, your studio gear is going to tilt back, and if its heavy, there’s going to be a lot of pressure put on the front panel. In order to keep your gear safe, you’ll want to try to avoid that.
Criss-Cross Method
Once you get that second screw in, you’re golden as long as you’ve chosen the right corners. I’d recommend tightening the rack screws in a criss-cross manner. You’ll want to choose a top corner first such as the upper right corner and then go for the opposite lower corner, in this case, the lower left corner.
Don’t waste your time tightening each screw one at a time. This is usually bad practice when tightening anything with multiple screws. You’ll want to make sure the screw is caught by the rack rail and then quickly move onto the next screw, then you can later tighten. The goal is to have your gear supported by the rack as soon as possible, whether you’re toughing it out by rack mounting your studio gear on your own, or through the help of a friend who probably won’t enjoy holding up your heavy gear if you take your time tightening one screw at a time.
Of course, before you rackmount your studio gear, you may be wondering what kind of screws you should be using. And there are some important things to consider.
What kind of screws?
Most racks are designed for 10-32 screws. The 10 designates their size without any specific numerical meaning. These screws are approximately 3/16″ in diameter. The 32 indicates 32 threads per inch. The best way to go about choosing screws for your rack, is to buy a pack of screws specifically designed for rack mounting. Brands like Chief, Gator, Raxxess, and Middle Atlantic Products, all produce quality rack screws. They’re usually sold in packs of 25, 50, and 100, and are very affordable.
Nearly ever pack of rackmount screws will include washers. You should always use washers when you rackmount your studio gear. Washers will help protect your gear, dispersing pressure over the surface of your gear so your front panel isn’t damaged by the screws, and also ensure that your screws stay reliably tightened.
Many rackmount screws also include additional thin nylon washers that go under your main washer to further help protect the front panel of your gear from nasty indentations around the screw area. This is something we also recommend.
Should I Keep Space Between Rack Gear?
As you acquire more studio gear, especially tube gear, you’ll notice that your gear can get quite hot. If hot studio equipment is stacked directly on top of each other, which may cover the gear’s air vents, this could potentially diminish the life of your gear.
This is not usually a huge concern with budget gear or solid state gear, but it is often the most expensive gear, especially vintage tube gear which can get the hottest. That’s why it can be important to give your gear a little space to breathe, just to play it safe. Allowing an additional gap or rack space between your hottest gear is a wise idea even though many studios appear to not take advantage of this.
It’s also good practice to not place your hot gear directly against other hot gear. Consider where your gear’s vents are. Consider what gear stays cooler and what gets hot. Keep these things in mind when rackmounting your gear to ensure your gear lasts longer.
What Kind of Rack Should I Buy?
As we stated earlier, rack sizes are very standardized. The main thing you’ll want to consider is the height of the rack, or how many rack units it support. The height of the rack you’ll want depends on the amount and size of gear you currently have or plan to have. The second thing you’ll want to consider is if you’ll need to travel with your gear, especially if you need rackmount gear for live use.
Size and Quality
When it comes to studio racks, your options vary from very basic budget-racks to high-quality enclosed premium racks. Racks can be pretty expensive, but the gear they hold is usually many times more expensive and far more precious. The quality of rack you purchase should go up as the quality of your gear goes up. You’ll also want to check is the number of rack units (explained earlier in this article) the rack you’re going to purchase has. A 4U rack is going to supply you with very little space for all your gear than a much larger 20U shelf, for example.
For the Beginner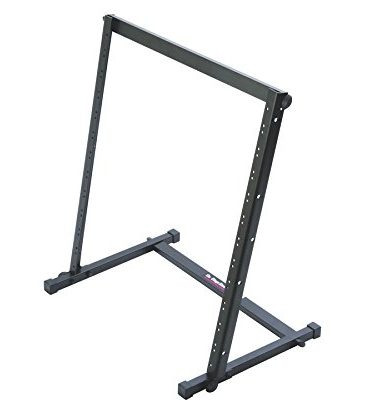
Chances are you haven’t yet spent thousands of dollars like a typical studio gear junkie. For budget gear, a rack like the above from OnStage will do a surprising job at supporting your gear without breaking the bank (see current price). When you first start acquiring rackmount gear, you really just need something to hold it up and support it. You don’t want to be stacking gear on top of gear for obvious reasons.
The disadvantages of a rack like the above are probably pretty obvious. You wouldn’t want your precious Neve 1073 or Vintage LA-2A sitting on one of these racks. That’s not to say that a rack like this won’t do a good job supporting your gear, but if you’ve got the money to spend on gear like that, then do yourself a favor and purchase a higher-quality rack. Your precious gear deserves the additional shelter and protection.
For a Typical Studio
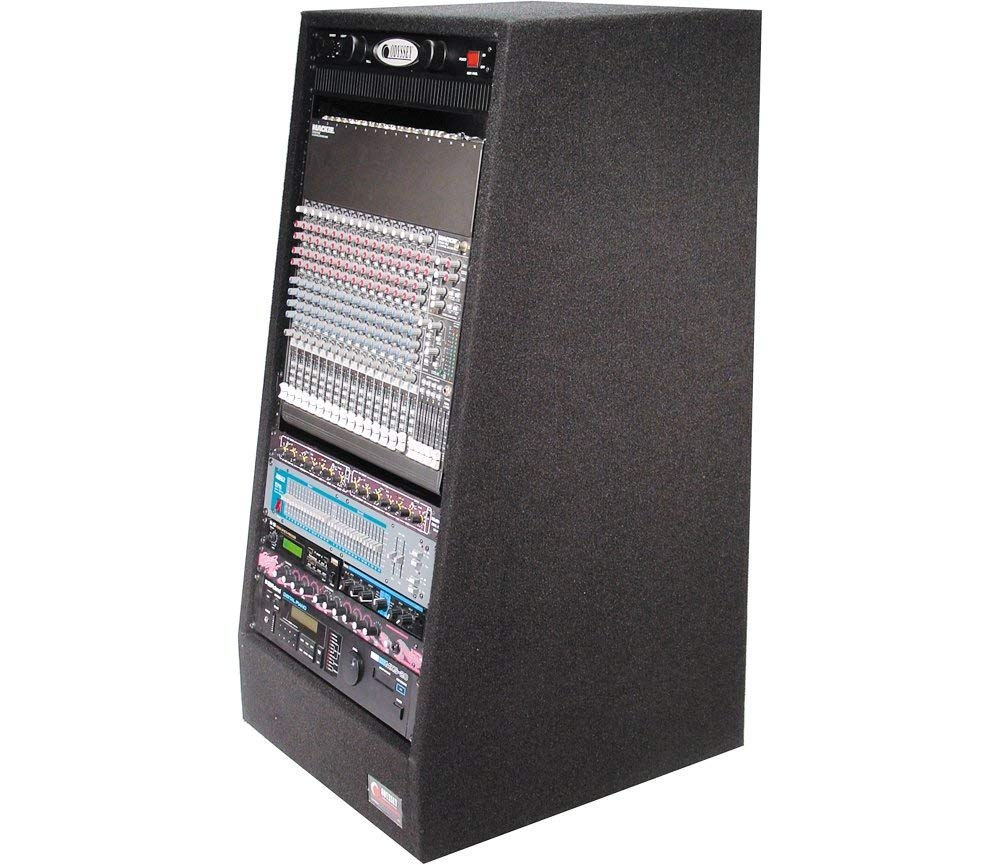
Now, here’s a nice rack. You’ll commonly see a rack of this quality in most intermediate studios. This should be all you need to protect any piece of rackmount studio gear. This rack from Odyssey may cost a couple hundred dollars (see current price), but is a great investment, even if you haven’t yet acquired all the gear to fill it. It’s always good to plan ahead. This rack has a carpeted exterior with a sturdy frame, with wheels on the bottom, allowing for great studio application. Unless you make the big bucks, we would highly recommend a rack of this quality and value.
For the Elite Studio
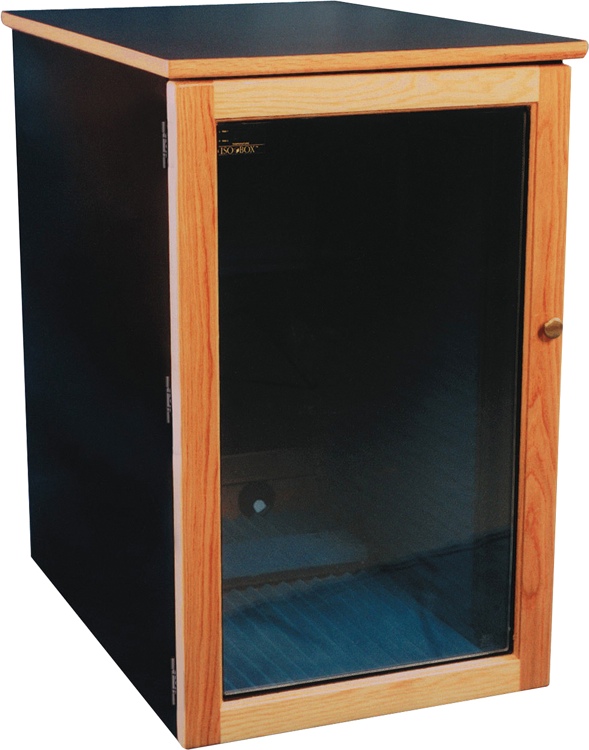
However, if you do make the big bucks, then hey, why not purchase the best rack you can buy? As you’ll see in many elite professional studios, a premium rack like the above from IsoBox has everything you could ever wish for in a rack. This includes shock-mount rails, rear rack rails, quiet thermal controlled fans for cooling, temperature displays, electrostatic Hepa filters, powerful interior noise reduction, insulated safety glass doors, and high-quality wood construction. You can expect to spend a couple thousand dollars on a premium rack like this. If you’re reading this article, chances are something like this is way beyond what you should be interested in (but it’s nice to dream).
For Travel
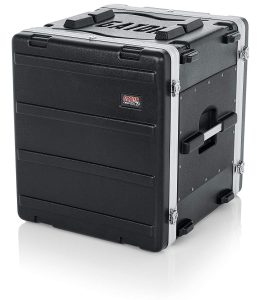 If you’re on the road, particularly if you’re a traveling audio engineer, producer, or for live audio, you’ll want portable racks designed for travel and protection of your gear. The above rack from Gator is perfect for the road. This case is made from a lightweight frame and heavy-duty aluminum to protect your gear from collision and damage that often occurs when traveling.
Like a case of luggage, there are wheels and a retractable tow handle which makes transporting your gear between gigs easy. The front and rear rails provide solid support for your gear. You simply unlatch the front and rear panel and you’re ready to start putting together your live sound. Gator makes these portable rack cases in a variety of sizes, including many with built-in power supplies that make it very simple to power up your gear.
In-Desk Racks
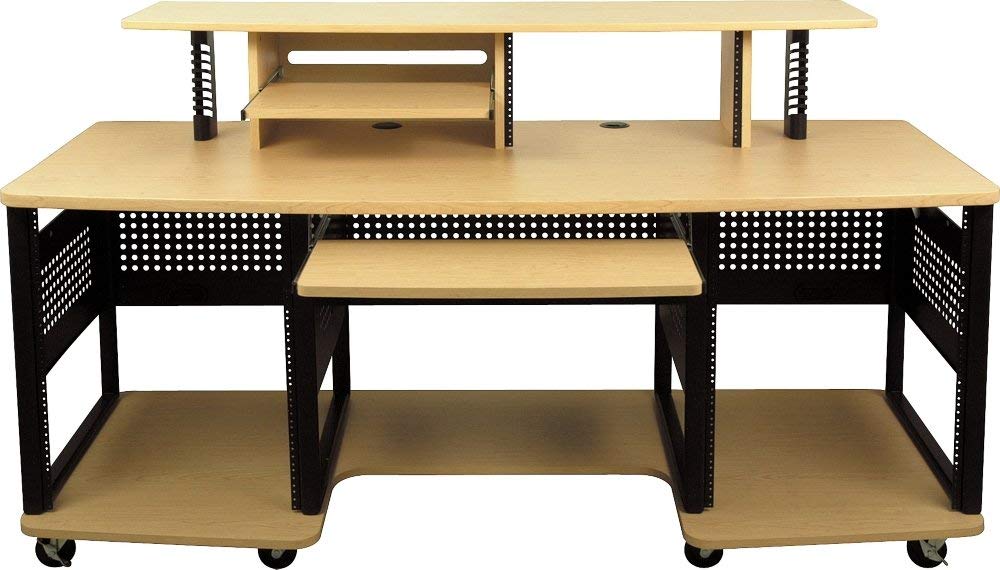
The last thing you want while you’re producing or mixing is having to leave your listening position to make an EQ, gain, or other mix adjustment. You’ll want your most important studio gear within your immediate reach for quick and convenient adjustment. This can include using your favorite compressor, equalizer, or your audio interface’s volume knob, for example. This is why many producers opt for a desk that includes rack space for your favorite gear.
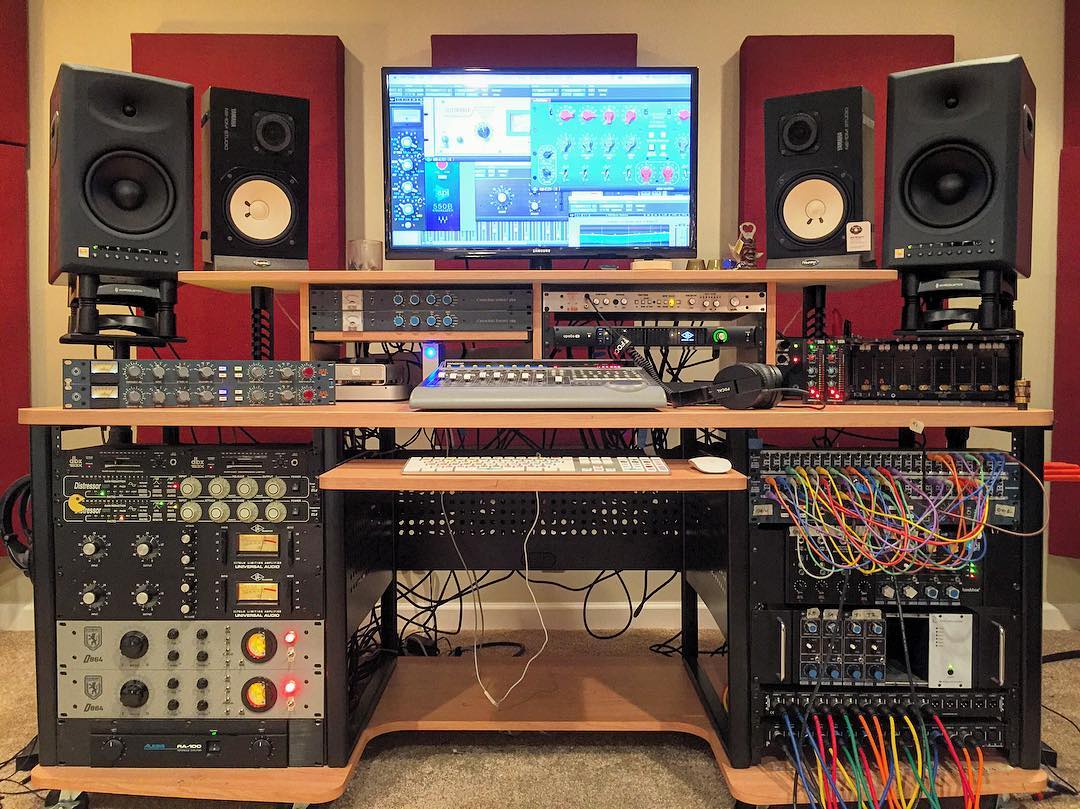
There are many different types of studio desks with rack space available, at various prices and quality. This includes the popular and affordable RTA Producer Station as shown above and below (see current price). For most home studio producers, you’ll probably want to skip purchasing a standalone rack and go right for such a desk with rack space. As you can see below, a desk with rack space keeps all your favorite gear in perfect reach.
What Else Should I Know?
Other Rackmount Use
Racks can do more than just securely hold your studio gear. There are other uses which may be better, especially if you’ve already bought a rack, but haven’t yet acquired all the gear to fill it.
When you first purchase a studio rack, you’ll likely have a lot of empty spaces until you acquire more gear. If you want your studio to look as nice and clean as possible, you may want to look at purchasing some blank rack panels in the meantime to fill this empty space. Blank rack panels come in various sizes such as 1U, 2U, 3U to fit perfectly into your empty rack space (see on Amazon). You can also mount vented panels placed between your gear if heat is a concern.
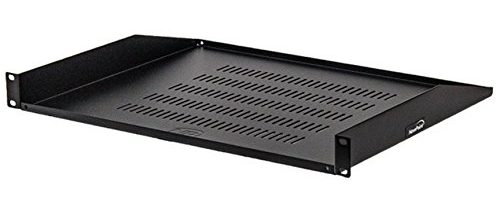
Another great use for filling empty rack space is to purchase a rackmount shelf like the one shown above. This can provide more storage space for gear and accessories, including holding up gear which is not designed to be rack-mounted.

Like the rackmount shelf, the rackmount drawer shown above is also highly useful for storing gear and accessories. Rackmount drawers are available in various sizes and can be great for storing cables, microphones and other gear and accessories for easy access.
Rackmount Power Conditioners
Most producers start their rack off with their power supply. There are rack-mountable power conditioners with multiple outlets designed for audio production. Having a power supply rack-mounted is especially useful for travel racks. They also allow your gear to be in close reach to the provided outlets, helping to manage your power cords and keep things organized and efficient.

Not only do power conditioners like the above from Furman, provide safe power to your gear, but they also have a number of other helpful benefits. Power sources can be really noisy, especially if you’re plugging in at an unfamiliar venue. Things like fluorescent lights and poorly shielded electronics can add considerable buzz and hum to your signal. Rackmountable power conditioners designed for professional audio also usually include power filtering to remove this undesirable noise and help keep your signal clean.
The above power conditioner also includes pullout lights with an adjustable dimmer (see current price). When placed at the top of your rack, the pullout lights will shine down on your gear, allowing your controls more visibility in a dark room, and enhancing the appearance of your studio as the lights shine down on your gear.
Rackmount Studio Gear Conclusion?
You can’t avoid it. At some point, as you acquire more studio gear, you’re going to need to rackmount it. If you don’t, you’re going to have an unorganized, ergonomically-challenging, cluttered mess of a studio. That simply wouldn’t make sense.
This article may have covered how to rackmount studio gear in-depth, but it’s really a simple process that you should not have much to worry about. Just buy a studio rack to the size you desire for your studio, your desired rack gear, and some rack screws. Carefully screw it into the rails with rack screws, and start building up your studio! We hope this article has been helpful. Happy producing.
Have a question you want answered? Ask us! Or join the Live Music Producer’s chat!
Have your own recommendations? Feel free to let us know in a comment below or reach us on our Twitter or our Instagram.


Great article, helped me a lot deciding.. i only still have 3 1ru units and would eventually add some more, this helped me decide.
[…] of proper organization and continuous creation for creating quality music. The best rack mount https://www.audiogearz.com/how-to-rackmount-gear/ allows you to have an organized system that works efficiently and effectively. In addition to your […]
Want more visitors for your website? Get thousands of keyword targeted visitors directly to your site. Boost revenues super fast. Start seeing results in as little as 48 hours. For additional information write a reply to: [email protected]
guys , can you recommend a rack layout template ?
[…] And just like with any midi controller (with keys or not), the majority are orientated towards portability. Something you also don’t tend to find with many mixers. The majority of mixers tend to be designed for studio use only & commonly come with a rack fitment kit. […]
[…] For those new to modular, the way modules are arranged in a rack-style case is comparable to basic rackmount practices commonly seen with audio […]