You’ve recorded your first vocal at home, and on its own it sounded fine. Then you play it over the beat, and something’s off: it’s thinner than the records you love, or muddier, or it jumps out on one line and vanishes on the next. You go looking for answers and find vocal chain presets for $29.99, and videos where someone stacks fourteen plugins on one voice and calls it their secret sauce.
The good news is that a first vocal chain is much simpler than that, and everything it needs is already in your DAW. But it can’t do the one thing people most want it to do, so let’s start there.
First, the take
No chain fixes a bad recording. It can even out a voice, brighten it and give it space, but it can’t remove the echo of a bare bedroom, a pop that hit the mic, or a singer who drifted a foot back halfway through a line. Those get baked into the take.
So get the recording right first: a steady distance, a pop filter in front of the mic, and a room that doesn’t ring (our guide on whether you need acoustic treatment has the cheap version). Our piece on whether you can really fix it in the mix explains why skipping this rarely ends well.
What a vocal chain is
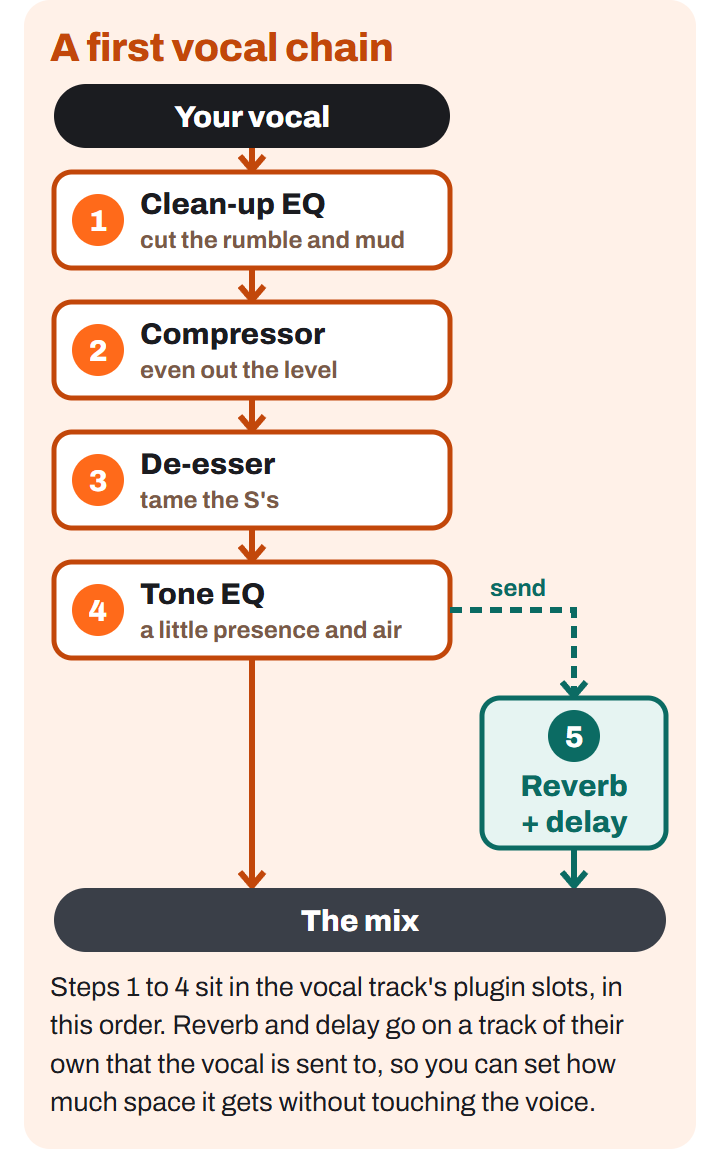
A vocal chain sounds like a piece of gear. It isn’t. It’s the list of effects your vocal runs through, one after another, the way a guitar runs through a row of pedals. In your DAW, it’s the stack of plugins in the vocal track’s slots, top to bottom.
The order matters because each effect hears what the one before it did. Put the compressor first and it reacts to everything in the recording, the rumble of the air conditioner and the boom from getting close to the mic included, so it squashes your vocal for the wrong reasons. Clean those up first and the compressor only has your voice to work on. The reason is simple: compression tends to bring up whatever already dominates a sound, so you fix the problems before you compress.
The same thinking sets the rest of the order. Shaping the tone comes after the level is under control, so you’re brightening a steady voice and not a jumpy one. Reverb and delay go last, and usually not in the chain at all, but on a separate track the vocal is sent to, so you can change how much space there is without touching the voice itself.
None of this needs a preset pack or a plugin sale. Every DAW already comes with what a first vocal chain needs. What it needs from you is a good take, a light hand and the bypass button.
Step 1: clean-up EQ
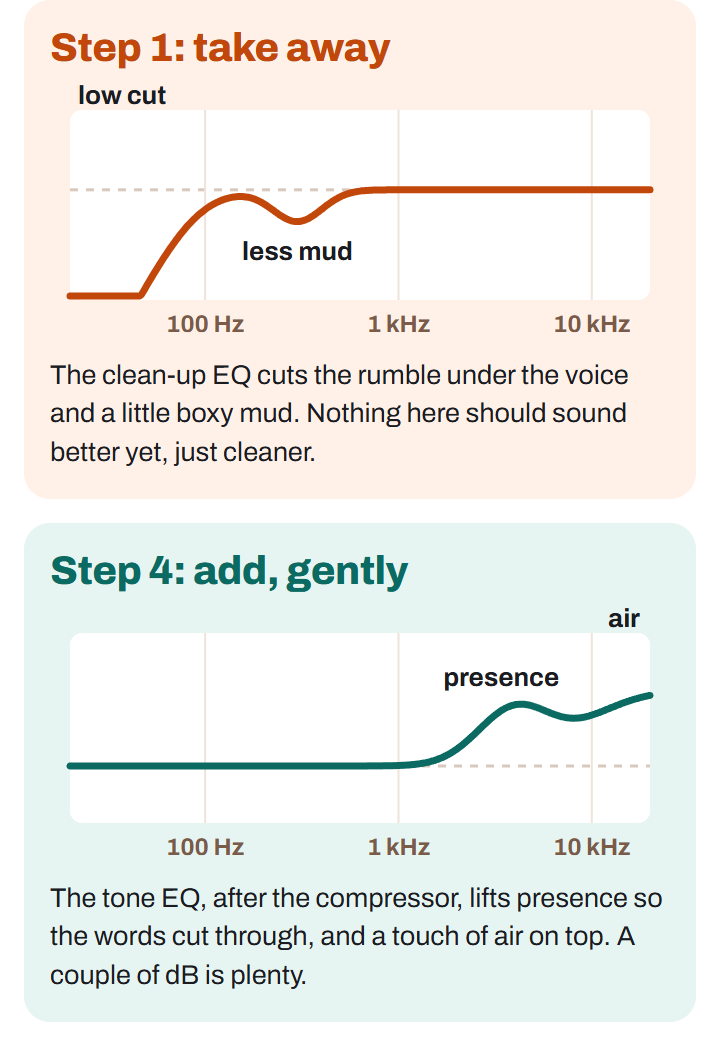
The first EQ is housekeeping. Turn on its low cut, also called a high-pass filter, and set it around 80 to 100 Hz. Nothing a voice sings lives much below that, but plenty of junk does: the rumble of traffic and air conditioning, a bump on the mic stand, and the extra bass you get from singing close to the mic. Cutting it makes room for the kick and bass, and keeps the compressor from reacting to it. For a deep male voice, start lower, around 70 Hz, and raise it until you hear the voice itself thin out, then back off a little.
If the voice still sounds boxy or muddy, sweep a narrow boost slowly through the low mids, somewhere between 200 and 500 Hz, until the problem jumps out, then turn that boost into a small cut, a few dB. That’s all this step does: take away what you don’t want. Making it sound good comes later.
Step 2: compression
A voice is uneven by nature. You sing the chorus louder than the verse, the end of a line drops away, one word leaps out. A compressor turns down the loudest moments so the whole vocal sits at a steadier level and stays in front of the beat. If you’re new to them, our guide to whether you need a compressor explains what one does, and our piece on the types of compressors explains why they don’t all sound alike.
For a first vocal, start gentle: a ratio around 3:1, a medium attack so the start of each word keeps a little bite, and the threshold set so the loudest lines are turned down by about 3 to 6 dB. Then raise the compressor’s output, often called makeup gain, until the vocal is as loud as it was with the compressor off. That last part matters. Louder always sounds better at first, so if you don’t match the level, you can’t tell whether the compressor helped or just made it louder.
If a vocal still jumps around after that, don’t crank one compressor harder. Ride the level by hand with volume automation, or use two compressors, each doing a little.
Step 3: the de-esser, and the before-or-after argument
Compression has a side effect: as it evens out the voice, the S’s and T’s come up with everything else, and on a bright mic they can get sharp enough to sting. A de-esser is a compressor that listens only to that hissy top end, usually somewhere between 5 and 10 kHz, and turns it down only when an S comes along. Find the frequency where your S’s are harshest, then set it so they drop a few dB. Too much and the singer starts to lisp, so listen for that.
Here’s the honest bit: engineers don’t agree on where it goes. Some put it before the compressor, so the compressor isn’t reacting to loud S’s. Others put it after, to catch the S’s the compressor brought up. Both work, and plenty of people use one in each spot. We put it after the compressor in a first chain, since that’s where the problem usually shows up, but if your S’s are making the compressor pump, try it first. Your ears get the final say.
Step 4: tone EQ
Now that the level is steady, you can shape the sound. A second EQ here does the flattering moves, gently. A small, wide boost somewhere around 3 to 5 kHz brings out presence, the part of a voice that helps the words cut through. A shelf above 10 kHz adds air, that breathy shine on top of a modern vocal. A couple of dB of either is usually plenty.
Go easy on both, and keep the de-esser in mind: boosting the top end brings the S’s back up. If you find yourself making big boosts, the problem is probably the recording or the mic, and no EQ will fully fix it. Check your work by switching the EQ off and on at the same volume.
Step 5: reverb and delay on a send
Reverb puts the voice in a space. Delay adds echoes. Both help a dry home recording sound finished, and both go last. But instead of putting them in the vocal’s own slots, put them on a separate track, called a send, aux or return depending on your DAW, and send the vocal to it.
The reason is control. On a send, the effect is set to 100 percent wet, all effect and no dry voice, and the send knob decides how much of the vocal goes into it. The voice itself stays untouched on its track, so you can turn the space up or down without changing the vocal’s level or tone, and one reverb can serve the backing vocals too. You can also put an EQ on the reverb track and cut its low end and some of its top, which keeps the space from turning into mud or fizz.
Start with a short room or plate reverb and a delay timed to the song’s tempo, a quarter or eighth note, mixed in low. Here’s a good test: turn the send up until you clearly hear the effect, then back it off until you just stop noticing it. That’s usually about right.
Where pitch correction goes, if you use it
If you use pitch correction, it goes first, before the clean-up EQ. It needs to hear the voice plain, before compression and effects change it, so it can read each note cleanly. For a natural sound, use a slower correction speed and only on the notes that need it. Turn it all the way up and you get the hard, robotic effect, which is great if that’s the sound you’re going for and distracting if it isn’t.
The five steps in your DAW
Every DAW names these a little differently, so here’s where to find them in the four most beginners start with. The names are the makers’ own.
GarageBand (Mac). Its EQ handles steps 1 and 4 (the first band is the low cut), and its Compressor handles step 2. GarageBand’s list of plugins is short, so for step 3, if you don’t find a de-esser, a narrow EQ cut where your S’s are harshest, between 5 and 10 kHz, does a gentler version of the job. For step 5, each track has its own Master Echo and Master Reverb sliders, which work like sends. Pitch Correction is a slider in the Audio Editor, with Limit to Key beside it.
Logic Pro. Channel EQ for steps 1 and 4, Compressor, then DeEsser 2. For step 5, put ChromaVerb and Tape Delay on an aux track and send the vocal to it. Pitch Correction, or Flex Pitch for note-by-note fixes, goes first.
FL Studio. Fruity Parametric EQ 2 for steps 1 and 4 and Fruity Compressor for step 2. There’s no plugin called a de-esser, but Maximus has a “De-esser Split Band” preset in the Producer Edition and up. For step 5, route the vocal’s mixer track to another mixer track holding Fruity Reeverb 2 and Fruity Delay 3, set fully wet. Pitch correction (Pitcher) only comes with the Signature Edition and up.
Ableton Live 12. Channel EQ, with its 80 Hz low-cut switch, or EQ Eight in Standard and Suite, for steps 1 and 4, and Compressor for step 2. Live has no de-esser as such either: in Standard and Suite, Multiband Dynamics can do it using only its top band, and in Intro, Compressor’s sidechain EQ set to the S’s does the trick. Put Reverb and Delay on a return track for step 5. Auto Shift handles pitch correction in every edition.
Presets and paid plugins: when they’re worth it
A vocal chain preset is someone else’s settings for their voice, their mic, their room and their song. Load it onto yours and it might sound fine, or it might boost the exact frequency your voice already has too much of. That’s why presets are a starting point at best. If you use one, go through it step by step with the bypass button, just as you would with your own.
Paid plugins can be worth it later, for a particular sound or a faster workflow: a compressor modeled on a classic, a smarter de-esser, pitch correction with more control. But they won’t fix a take, and they won’t make a chain you don’t understand any better. Learn the five steps with your DAW’s own plugins first. When you know exactly what you want a plugin to do that yours can’t, that’s the time to buy one.
And keep it short. A chain that runs to fourteen plugins usually sounds worse than the bypass, because each one is a chance to undo the one before. If a plugin isn’t clearly making the vocal better when you switch it off and on, take it out.
Happy producing.